


前几天做了树莓派Raspberry Pi 3B FRRouting软路由后,然后镇江到日本VU的网络就炸了,整天ping高还丢包。但是最近发现阿里云香港轻量改路由了,三网联通就很香,阿里云到HE Tunnel只要2ms,立即改为HE
咱的最终目的如下
- 低延迟访问IPV6网络
- 访问开发服务器网络
- 把全部Bird替换为FRRouting
配置的服务器环境
- 树莓派3b Ubuntu 18.04
- 阿里云香港轻量 Ubuntu 18.04
步骤
I 组网
- 首先是要组网,咱直接就是使用了ZeroTier组网(安装ZeroTier然后加入网络这里就不写了)
- 其他方式组网也行(GRE IPIP WG)….
II 安装FRRouting
安装FRRouting (使用Debian系统的可以跑一下下面这个脚本)
如果是Debian 10 官方CI镜像安装使用的可直接使用下面那个
#YFsama Debian 10 OpenStack鏡像使用的安裝FRR脚本
#MercyCloud购买的VPS安装Debian 10 系统的可直接使用

wget http://bash.rbq.sh/bash/debian10_frrouting_install.sh
bash debian10_frrouting_install.sh
其他debian系 系统请使用这个
#!/bin/bash

# 更新系統 組件
apt update -y
apt upgrade -y
apt install -y curl gnupg2 traceroute

# 安裝FRRouting

curl -s https://deb.frrouting.org/frr/keys.asc | sudo apt-key add -
FRRVER="frr-stable"
echo deb https://deb.frrouting.org/frr $(lsb_release -s -c) $FRRVER | sudo tee -a /etc/apt/sources.list.d/frr.list
sudo apt update -y && sudo apt install -y frr frr-pythontools

# 開啓IP轉發
echo "
net.ipv4.conf.all.forwarding = 1
net.ipv6.conf.all.disable_ipv6 = 0
net.ipv6.conf.default.disable_ipv6 = 0
net.ipv6.conf.lo.disable_ipv6 = 0
net.ipv6.conf.default.forwarding = 1
net.ipv6.conf.all.forwarding = 1
net.ipv6.conf.all.proxy_ndp = 1
net.ipv6.conf.all.accept_ra = 2
" > /etc/sysctl.conf

sysctl -p

# 打开Frr全部功能
sed -i "s/=no/=yes/g" /etc/frr/daemons
service frr restart

sudo vtysh
CentOS安装请查看官方文档
III 配置网卡
阿里云香港
echo "
auto eth0:1
iface eth0:1 inet6 static
	address (替换为你想给该机器配置的ipv6地址)
	netmask 48

#以下这段请直接去HE Tunnel Configure点击 Debian 复制替换
auto he-ipv6
iface he-ipv6 inet6 v4tunnel
        address he分配的地址 ::2
        netmask 64
        endpoint he 服务器地址
        local 你网卡的地址(如果是阿里云轻量应该是172.xx.xx.xx, ip addr 命令查看)
        ttl 255
        #gateway he分配的地址 ::1
" >> /etc/network/interfaces
树莓派
IV 配置OSPF
在两台机器的vtysh下输入
!
router ospf6
 redistribute connected
 interface zthnhlojjm(替换为你的zt网卡/其他组网方式的网卡) area 0.0.0.0
!
V 配置BGP
树莓派
!
router bgp 你的ASN
 bgp router-id 172.168.21.1
 no bgp default ipv4-unicast
 neighbor 阿里云HK IPV6 remote-as 你的ASN
 neighbor 阿里云HK IPV6 update-source eth0
 !
 address-family ipv6 unicast
  network 你要宣告的IP段
  neighbor 阿里云HK IPV6 activate
 exit-address-family
!
阿里云香港配置
!
router bgp 你的ASN
bgp router-id 172.17.21.3
no bgp default ipv4-unicast
neighbor HE服务器的IPV6 remote-as 6939
neighbor 树莓派的IPV6 remote-as 你的ASN
neighbor 树莓派的IPV6 update-source eth0
!
address-family ipv6 unicast
network 你要宣告的IP段
neighbor HE服务器的IPV6 activate
neighbor HE服务器的IPV6 route-map HEBGPOUT out
neighbor 树莓派的IPV6 activate
exit-address-family
!
ipv6 prefix-list PRE9886 seq 5 permit 你要宣告的IP段
!
route-map HEBGPOUT permit 5
match ipv6 address prefix-list PRE9886
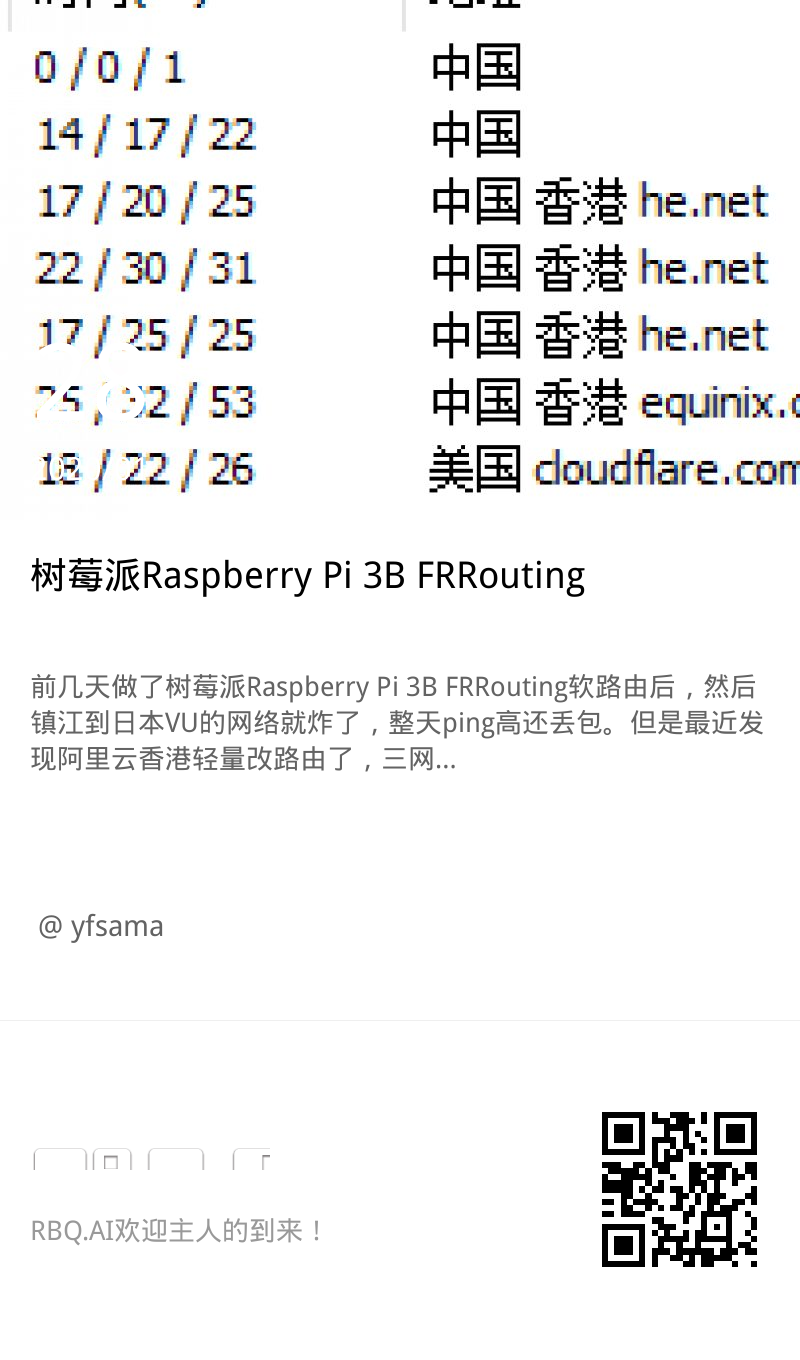
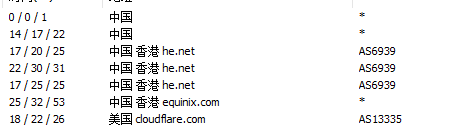
!不出意外的话,你现在即可20ms以下访问到香港 CloudFlare 了。
如果也是Ubuntu,记得关闭UFW防火墙( ufw disable )


又过来围观大佬,操作不来